The programs we have studied so far have used a top level (application) shell widget and a single child widget (e.g. PushButton).
Most Motif programs will need to employ a combination of many widgets, in order to produce an effective GUI. For example, a text editor application usually requires a combination of buttons, menus, text areas etc.
In this Chapter we will look at how we arrange widgets and furthermore explicitly position widgets within a GUI.
We should now be familiar with the concept of a tree of widgets which is formed by creating widgets with other widgets as parents. When we combine widgets, we simply carry this principle further. Our major concern when combing widgets is to place them in some order and some relative position, with respect to other widgets. Usually we do not want widgets to obscure each other. Care must also be taken with the organisation and positioning of widgets when the window containing the widgets is resized. In particular:
As we shall discover shortly, Motif provides a great deal of flexibility in the behaviour of widgets in such circumstances. The GUI programmer should carefully consider the means of interaction most suitable for the particular application and then select the most appropriate Motif widget and means of organisation to achieve this.
The management of widget geometry is taken care of by certain manager widgets. The RowColumn and Form widgets are the most common widgets used for arranging widgets.
Consider a simple multiple widget program output (Fig 8.1).
Fig. 8.1 Simple Multiple Widget Layout This layout is usually specified by the widget tree structure illustrated in Figure 8.2.
The application shell is still be the top level, below this there would be a RowColumn or Form widget which would contain some primitive widgets (e.g. PushButtons) and define exactly how they are to be positioned relative to each other. Several possible arrangements are available and the format of each depends on the context of the application (e.g. how the widgets are displayed if the window size is increased or decreased).
Fig. 8.2 Multiple Widget Tree We will now consider how we can arrange widgets by considering the RowColumn and Form widgets.
This the simplest widget in terms of how it manages the positioning of its child widgets. Widgets are positioned as follows:
Let us now look at two programs that illustrate the above principles by studying how we achieve the outputs illustrated in Fig. 8.1 (rowcol1.c program) and Fig. 8.3 (rowcol2.c program). As can be seen in these figures, rowcol1.c lays 4 PushButtons vertically (default) whereas rowcol2.c sets the XmNorientation resource for a horizontal layout of the same 4 buttons. The output of the programs are illustrated in Fig 8.3.
Fig. 8.3 RowColumn program output
The rowcol1.c program is as follows:
#include <Xm/PushB.h>
#include <Xm/RowColumn.h>

main(int argc, char **argv)

{
    Widget top_widget, rowcol;
    XtAppContext app;

    top_widget = XtVaAppInitialize(&app, "rowcol", NULL, 0,
        &argc, argv, NULL, NULL);

    rowcol = XtVaCreateManagedWidget("rowcolumn",
        xmRowColumnWidgetClass, top_widget, NULL);

    (void) XtVaCreateManagedWidget("button 1",
        xmPushButtonWidgetClass, rowcol, NULL);

    (void) XtVaCreateManagedWidget("button 2",
        xmPushButtonWidgetClass, rowcol, NULL);

    (void) XtVaCreateManagedWidget("button 3",
        xmPushButtonWidgetClass, rowcol, NULL);

    (void) XtVaCreateManagedWidget("button 4",
        xmPushButtonWidgetClass, rowcol, NULL);

    XtRealizeWidget(top_widget);
    XtAppMainLoop(app);
}
The rowcol1.c program does not really do much. It provides no callback
functions to perform any tasks. It simply creates a RowColumn widget,
rowcol, and creates 4 child buttons with this. Note that rowcol is a
child of app -- the application shell widget. The
<Xm/RowColumn.h> header file must also be included.
The rowcol2.c program is identical to rowcol1.c, except that the
XmNorientation resource is set at the rowcol widget creation with:
rowcol = XtVaCreateManagedWidget("rowcolumn",
                xmRowColumnWidgetClass, top_widget,
                XmNorientation, XmHORIZONTAL,
                NULL);
Forms are the other primary geometry manager widget. They allow more complex handling of positioning of child widgets and can handle widgets of different sizes.
There is more than one way to arrange widgets within a form. We will look at three programs form1.c, form2.c and form3.c that achieve similar results but illustrate different approaches to attaching widgets to forms. All three programs produce initial output illustrated in Fig. 8.4 however if the window is resized, the different attachment policies have a different effect (Figs 8.5, 8.6 and 8.7).
Fig. 8.4 form1.c initial output
Widgets are placed in a form by specifying the attachment of widgets to edges of other widgets. The edges of widgets can either be on the form widget itself, or on other child widgets. Edges are referred to by top, bottom, left and right attachments. A widget has resources, such as XmNtopattachment to attach a widget, to an appropriate edge:
Let us look at how all this works in the form1.c program:
#include <Xm/Xm.h>
#include <Xm/PushB.h>
#include <Xm/Form.h>


main (int argc, char **argv)

{ XtAppContext app;
  Widget   top_wid, form,
	          button1, button2,
           button3, button4;
  int n=0;


  top_wid = XtVaAppInitialize(&app, "Form1",
        NULL, 0, &argc, argv, NULL, NULL);

  /* create form and child buttons */

  form = XtVaCreateManagedWidget("form",
        xmFormWidgetClass, top_wid, NULL);

  button1 = XtVaCreateManagedWidget("Button 1",
      xmPushButtonWidgetClass, form,
      /* attach to top, left of form */
      XmNtopAttachment, XmATTACH_FORM,
      XmNleftAttachment, XmATTACH_FORM,
      NULL);

  button2 = XtVaCreateManagedWidget("Button 2",
      xmPushButtonWidgetClass, form,
      XmNtopAttachment, XmATTACH_WIDGET,
      XmNtopWidget, button1, /* top to button 1 */
      XmNleftAttachment, XmATTACH_FORM, /* left, bottom to form */
      XmNbottomAttachment, XmATTACH_FORM,
      NULL);

  button3 = XtVaCreateManagedWidget("Button 3",
      xmPushButtonWidgetClass, form,
      XmNtopAttachment, XmATTACH_FORM, /* top, right to form */
      XmNrightAttachment, XmATTACH_FORM,
      XmNleftAttachment, XmATTACH_WIDGET, /* left to button 1 */
      XmNleftWidget, button1,
      NULL);

  button4 = XtVaCreateManagedWidget("Button 4",
      xmPushButtonWidgetClass, form,
      XmNbottomAttachment, XmATTACH_FORM, /* bottom right to form */
      XmNrightAttachment, XmATTACH_FORM,
      XmNtopAttachment, XmATTACH_WIDGET,
      XmNtopWidget, button3, /* top to button 3 */
      XmNleftAttachment, XmATTACH_WIDGET,
      XmNleftWidget, button2, /* left to button 2 */
      NULL);
  XtRealizeWidget (top_wid);
  XtAppMainLoop (app);
}
In the above program, the form widget is created as a child of app
and 4 buttons are the children of form. The inclusion of
<Xm/Form.h> header file is always required.
The attachment of the button widgets is as follows:
It is advisable to control the attachment as much as possible, so that any resizing of the form will still preserve the desired order. Fig 8.5 shows the effect of an enlargement of the window produce by the form1.c program. Notice that the relative sizes of individual buttons is not preserved.
Fig. 8.4 form1.c resized window output
We can position the side of a widget to a position in a form. Motif assumes that a form has been partitioned into a number of segments. The position specified is the number of segments from the top left corner.
By default there is assumed to be 100 divisions along the top, bottom, left and
right sides. This can be changed by setting the form resource
XmNfractionBase
The position of a particular side of a widget is set by the widget resource XmNtopAttachment etc. to XmATTACH_POSITION and then setting another resource XmNtopPosition etc. to the appropriate integer value.
The form2.c program specifies the top left of button1 to the edges of the form. The right and bottom edges are attached half way (50 out of a 100 units) along the respective bottom and right edges of the form. The button2, button3 and button4 widgets are positioned similarly.
The complete form2.c program listing is:
#include <Xm/Xm.h>
#include <Xm/PushB.h>
#include <Xm/Form.h>


main (int argc, char **argv)

{ XtAppContext app;
  Widget   top_wid, form,
	          button1, button2,
           button3, button4;
  int n=0;


  top_wid = XtVaAppInitialize(&app, "Form2",
        NULL, 0, &argc, argv, NULL, NULL);

  /* create form and child buttons */

  form = XtVaCreateManagedWidget("form", xmFormWidgetClass,
      top_wid, NULL);

  button1 = XtVaCreateManagedWidget("Button 1",
      xmPushButtonWidgetClass, form,
      /* attach to top, left of form */
      XmNtopAttachment, XmATTACH_FORM,
      XmNleftAttachment, XmATTACH_FORM,
      XmNrightAttachment, XmATTACH_POSITION,
      XmNrightPosition, 50,
      XmNbottomAttachment, XmATTACH_POSITION,
      XmNbottomPosition, 50,
      NULL);


  button2 = XtVaCreateManagedWidget("Button 2",
      xmPushButtonWidgetClass, form,
      XmNbottomAttachment, XmATTACH_FORM,
      XmNleftAttachment, XmATTACH_FORM,
      XmNrightAttachment, XmATTACH_POSITION,
      XmNrightPosition, 50,
      XmNtopAttachment, XmATTACH_POSITION,
      XmNtopPosition, 50,
      NULL);

  button3 = XtVaCreateManagedWidget("Button 3",
      xmPushButtonWidgetClass, form,
      XmNtopAttachment, XmATTACH_FORM,
      XmNrightAttachment, XmATTACH_FORM,
      XmNleftAttachment, XmATTACH_POSITION,
      XmNleftPosition, 50,
      XmNbottomAttachment, XmATTACH_POSITION,
      XmNbottomPosition, 50,
      NULL);


  button4 = XtVaCreateManagedWidget("Button 4",
      xmPushButtonWidgetClass, form,
      XmNbottomAttachment, XmATTACH_FORM,
      XmNrightAttachment, XmATTACH_FORM,
      XmNleftAttachment, XmATTACH_POSITION,
      XmNleftPosition, 50,
      XmNtopAttachment, XmATTACH_POSITION,
      XmNtopPosition, 50,
      NULL);


  XtRealizeWidget (top_wid);
  XtAppMainLoop (app);
}
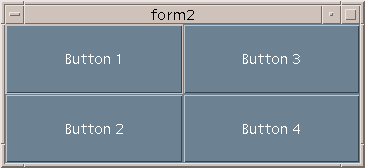
One effect of this type of widget attachment is that the relative size of component widgets is preserved when the window containing these widgets is resized (Fig 8.6).
Fig. 8.6 form2.c output (resized)
Yet another way to attach widgets is to place an edge opposite edges of another widget. This is achieved by setting the XmNtopAttachment etc. resources to XmATTACH_OPPOSITE_WIDGET. Just as with XmATTACH_WIDGET, a widget has to be associated with the XmNwidget resource.
With the opposite form of attachment ``similar'' edges are attached. In the form3.c program we attach the right edge of button2 to the right edge of button1, the left edge of button3 with the left of button1 and so on.
The complete form3.c program listing is:
#include <Xm/Xm.h>
#include <Xm/PushB.h>
#include <Xm/Form.h>


main (int argc, char **argv)

{ XtAppContext app;
  Widget   top_wid, form,
	          button1, button2,
           button3, button4;
  int n=0;


  top_wid = XtVaAppInitialize(&app, "Form3",
        NULL, 0, &argc, argv, NULL, NULL);

  /* create form and child buttons */

  form = XtVaCreateManagedWidget("form", xmFormWidgetClass,
      top_wid, NULL);

  button1 = XtVaCreateManagedWidget("Button 1",
      xmPushButtonWidgetClass, form,
      /* attach to top, left of form */
      XmNtopAttachment, XmATTACH_FORM,
      XmNleftAttachment, XmATTACH_FORM,
      NULL);


  button2 = XtVaCreateManagedWidget("Button 2",
      xmPushButtonWidgetClass, form,
      XmNtopAttachment, XmATTACH_WIDGET,
      XmNtopWidget, button1,
      XmNleftAttachment, XmATTACH_FORM,
      XmNbottomAttachment, XmATTACH_FORM,
      XmNrightAttachment, XmATTACH_OPPOSITE_WIDGET,
      XmNrightWidget, button1,
      NULL);

  button3 = XtVaCreateManagedWidget("Button 3",
      xmPushButtonWidgetClass, form,
      XmNtopAttachment, XmATTACH_FORM,
      XmNrightAttachment, XmATTACH_FORM,
      XmNleftAttachment, XmATTACH_WIDGET,
      XmNleftWidget, button1,
      NULL);


  button4 = XtVaCreateManagedWidget("Button 4",
      xmPushButtonWidgetClass, form,
      XmNbottomAttachment, XmATTACH_FORM,
      XmNrightAttachment, XmATTACH_FORM,
      XmNtopAttachment, XmATTACH_WIDGET,
      XmNtopWidget, button3,
      XmNleftAttachment, XmATTACH_OPPOSITE_WIDGET,
      XmNleftWidget, button3,
      NULL);


  XtRealizeWidget (top_wid);
  XtAppMainLoop (app);
}
The relative sizing of widgets within the window is not guaranteed to be
preserved, as in form1.c (Fig 8.7). However this method of
layout is sometimes a natural way to express the configuration of the widgets.
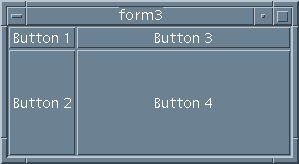
Fig. 8.7 form3.c output (resized)
Let us finish off this section by building a Form widget that contains two different types of widget. It will also use callback functions thus making a more complete application program example.
The program is called arrows.c. It creates 4 ArrowButton widgets arranged in a north, south, east and west type arrangement. In the middle of the 4 ArrowButtons is a PushButton, labelled ``Quit''. The output of arrows.c is shown in Fig. 8.8.
Fig. 8.8 arrows.c output
The program listing is:
#include <Xm/Xm.h>
#include <Xm/PushB.h>
#include <Xm/ArrowB.h>
#include <Xm/Form.h>

/* Prototype callback fns */
void north(Widget , XtPointer ,
	          XmPushButtonCallbackStruct *),
     south(Widget , XtPointer ,
	          XmPushButtonCallbackStruct *),
     east(Widget , XtPointer ,
	          XmPushButtonCallbackStruct *),
     west(Widget , XtPointer ,
	          XmPushButtonCallbackStruct *),
     quitb(Widget , XtPointer ,
	          XmPushButtonCallbackStruct *);


main(int argc, char **argv)

{
    XtAppContext app;
    Widget top_wid, form,
           arrow1, arrow2,
           arrow3, arrow4,
           quit;

    top_wid = XtVaAppInitialize(&app, "Multi Widgets",
                 NULL, 0, &argc, argv, NULL, NULL);


    form = XtVaCreateWidget("form", xmFormWidgetClass, top_wid,
                 XmNfractionBase,     3,
	                NULL);

    arrow1 = XtVaCreateManagedWidget("arrow1",
	                xmArrowButtonWidgetClass, form,
	                XmNtopAttachment,    XmATTACH_POSITION,
	                XmNtopPosition,      0,
	                XmNbottomAttachment, XmATTACH_POSITION,
	                XmNbottomPosition,   1,
	                XmNleftAttachment,   XmATTACH_POSITION,
	                XmNleftPosition,     1,
	                XmNrightAttachment,   XmATTACH_POSITION,
	                XmNrightPosition,    2,
	                XmNarrowDirection,   XmARROW_UP,
	                NULL);

    arrow2 = XtVaCreateManagedWidget("arrow2",
	                xmArrowButtonWidgetClass, form,
	                XmNtopAttachment,    XmATTACH_POSITION,
	                XmNtopPosition,      1,
	                XmNbottomAttachment, XmATTACH_POSITION,
	                XmNbottomPosition,   2,
	                XmNleftAttachment,   XmATTACH_POSITION,
	                XmNleftPosition,     0,
	                XmNrightAttachment,   XmATTACH_POSITION,
	                XmNrightPosition,    1,
	                XmNarrowDirection,   XmARROW_LEFT,
	                NULL);

    arrow3 = XtVaCreateManagedWidget("arrow3",
	                xmArrowButtonWidgetClass, form,
	                XmNtopAttachment,    XmATTACH_POSITION,
	                XmNtopPosition,      1,
	                XmNbottomAttachment, XmATTACH_POSITION,
	                XmNbottomPosition,   2,
	                XmNleftAttachment,   XmATTACH_POSITION,
	                XmNleftPosition,     2,
	                XmNrightAttachment,   XmATTACH_POSITION,
	                XmNrightPosition,    3,
	                XmNarrowDirection,   XmARROW_RIGHT,
	                NULL);

   arrow4 = XtVaCreateManagedWidget("arrow4",
	                xmArrowButtonWidgetClass, form,
	                XmNtopAttachment,    XmATTACH_POSITION,
	                XmNtopPosition,      2,
	                XmNbottomAttachment, XmATTACH_POSITION,
	                XmNbottomPosition,   3,
	                XmNleftAttachment,   XmATTACH_POSITION,
	                XmNleftPosition,     1,
	                XmNrightAttachment,   XmATTACH_POSITION,
	                XmNrightPosition,    2,
	                XmNarrowDirection,   XmARROW_DOWN,
	                NULL);

   quit =XtVaCreateManagedWidget("Quit",
	                xmPushButtonWidgetClass, form,
	                XmNtopAttachment,    XmATTACH_POSITION,
	                XmNtopPosition,      1,
	                XmNbottomAttachment, XmATTACH_POSITION,
	                XmNbottomPosition,   2,
	                XmNleftAttachment,   XmATTACH_POSITION,
	                XmNleftPosition,     1,
	                XmNrightAttachment,   XmATTACH_POSITION,
	                XmNrightPosition,    2,
	                NULL);

    /* add callback functions */

    XtAddCallback(arrow1, XmNactivateCallback, north, NULL);
    XtAddCallback(arrow2, XmNactivateCallback, west, NULL);
    XtAddCallback(arrow3, XmNactivateCallback, east, NULL);
    XtAddCallback(arrow4, XmNactivateCallback, south, NULL);
    XtAddCallback(quit, XmNactivateCallback, quitb, NULL);

    XtManageChild(form);
    XtRealizeWidget(top_wid);
    XtAppMainLoop(app); }


    /* CALLBACKS */

void north(Widget w, XtPointer client_data,
	          XmPushButtonCallbackStruct *cbs)

    { printf("Going North\n");
    }

void west(Widget w, XtPointer client_data,
	         XmPushButtonCallbackStruct *cbs)

    { printf("Going West\n");
    }

void east(Widget w, XtPointer client_data,
	         XmPushButtonCallbackStruct *cbs)

    { printf("Going East\n");
    }

void south(Widget w, XtPointer client_data,
	          XmPushButtonCallbackStruct *cbs)

    { printf("Going South\n");
    }

void quitb(Widget w, XtPointer client_data,
	          XmPushButtonCallbackStruct *cbs)

    { printf("quit button pressed\n");
      exit(0);
    }
The arrows.c program uses the fraction base positioning method of placing widgets within a form:
NEED SOME