What You'll Learn
- Using IntelliJ to create a Spring Boot project
- Adding dependencies to the Spring Boot project
- Choosing the right options for the Java SDK, build tool and names
- What the Spring Initializr provides
- Where to find the key features in Spring Boot
- How to run a Spring Boot application
Open IntelliJ and create a new project either from the opening dialog or from File > New.
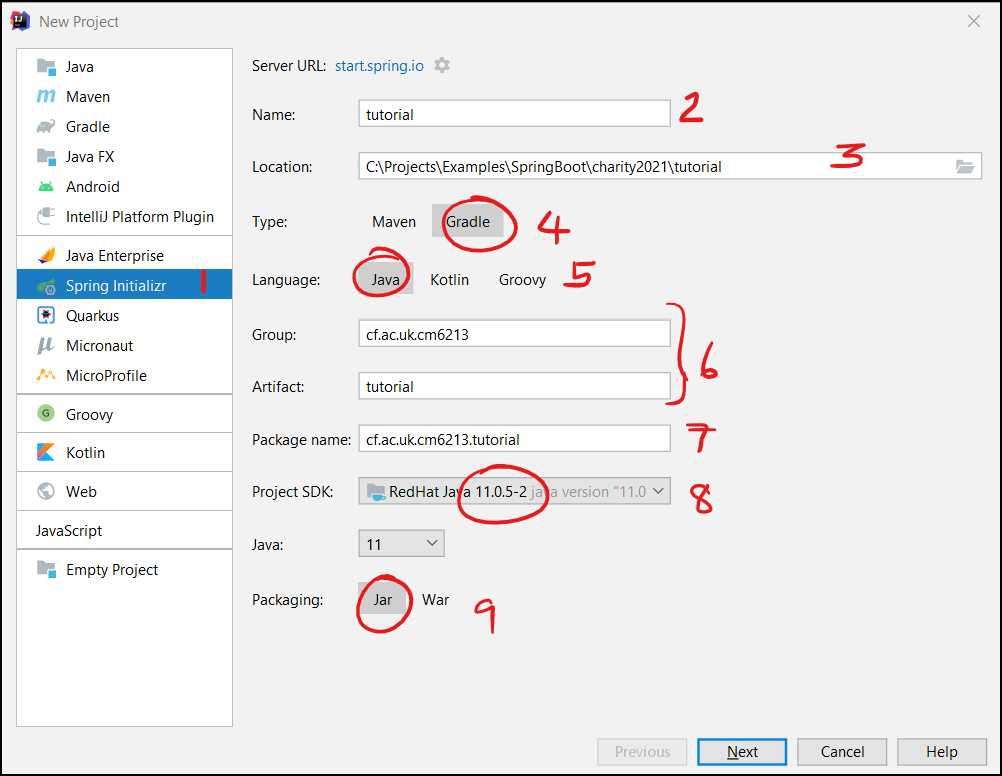
Select the Spring Initializr option (1). Notice how it offers you the choice of https://start.spring.io or Custom.
Try going to that website in a browser. It is the same tool in web form.
Project Name and Locations
Give your project a name (2) and a location (3). I suggest not using OneDrive and preferring Gitlab as your backup. Try to keep your path short as some programs can fail with long paths.
Build type
You choose to use Maven or Gradle as the build tool. We will use Gradle (4) in our examples as the build file is more readable. It is worth learning the basics of Maven as many examples will use it.
Language
Spring Boot supports multiple JVM-based languages. We will stick with Java (5).
Group and artifact
This is the identifier for the artifact produced by the project. If you wanted to publish the packaged jar file to a repository for others to use (say the Maven repository), the group and artifact id (6) form the name of that artifact. This will make more sense when you see the Gradle file that is produced. Try to imagine that you were building software for someone else to use in the future. The group and artifact id would identify your software.
Package names
When the code is generated, it is good to create a root package structure (7). Typically, these are reverse domain names.
Which Java SDK and version
Pick a Java SDK (8). You may have a more up to date version. You can then pick the version of Java that you won't to build against. This may be lower than the version of Java installed. For example, you may not want to use language features from Java 15, but take advantage of security patches. In this case, you can use Java 15, but build against Java 11 (say).
Packaging
When Spring Boot builds your application, it can create two different types of artifact; a Jar file or a War file (9). The Jar files are executable Jar files and contain all of the code required to run the Spring Boot application. This means that Jar contains an application server such as Apache Tomcat, Jetty or Undertow (you can configure this). War files are the older way of packaging server-side Java code. With War files, the application server is run separately, and the War files are deployed into the server either using tools or by dropping the file into a known location.
Then click "Next".

Choose the version of Spring Boot
Spring support a number of versions. Choose the latest version that is not marked as a SNAPSHOT or MILESTONE (1).
Add dependencies
We want our first project to be:
- A web project
- A productive experience
...so we need to add some dependencies (think Python pip) to our project.
Web dependencies
Select dependencies (2). The selected dependencies will appear in the list (3).
To make this project into a web project, we will add two dependencies:
- Web > Spring Web (this adds Spring MVC capabilities and the Tomcat server)
- Template Engines > Thymeleaf (this add the Thymealeaf server-side templating engine)
With these dependencies, Spring Boot can listen for web requests, route then to a special type of component known as a controller and return data to a view. Thymeleaf supports templating and will inject the data into the template.
Productive
To make the project development cycle more productive, we will add:
- Developer Tools > Spring Boot DevTools
Spring Boot DevTools allows us to avoid server restarts and supports LiveReload of web pages. If you want, you may add Lombok as well.
Now Click "Finish"
Let's have a look at the source code that is generated from this process.
The Java source
The tool will generate code in both the src/main and src/test folders. The project structure follows a convention. It is possible to change this but it requires configuration. Spring Boot follows a "convention over configuration" approach. Use the defaults where possible.
The main class
Look in the /src/main folder.
package uk.ac.cf.cs.cm6213.tutorialcompanion;

import org.springframework.boot.SpringApplication;
import org.springframework.boot.autoconfigure.SpringBootApplication;

@SpringBootApplication
public class TutorialCompanionApplication {

    public static void main(String[] args) {
        SpringApplication.run(TutorialCompanionApplication.class, args);
    }

}
In this code, we can see the first use of an annotation.
@SpringBootApplication
This tells Spring Boot that this class is the entry point for the application. Note, how the code invokes the class SpringApplication and passes the class of our generated class. This tells us that we are calling Spring with our own code as a parameter, so that Spring can call it or introspect it.
The test class
A simple test class is also created. This is an empty test, but is enough to test that Spring Boot has loaded correctly as it would fail if the application hasn't started.
The Gradle source
The tool creates an initial build.gradle file.
Examine the file and notice:
- the dependencies section. Look back at what we added in the tool earlier.
- the source compatibility
- the Spring Boot version
Notice also that the tool generates a .gitignore file and the Gradle wrapper files (gradlew, etc). These files are put into source control. This means that the version of Gradle required to build the project is bundled with the project.
This means that a developer can build your code by checking out the project and running
./gradlew build
In this codelab, we have used the Spring Initializr tool to create a first Spring Boot project. In a subsequent codelab, we will run the project using Gradle and the command line.