QuickTime provides a wide range of sophisticated visual effects. QuickTime's visual effects architecture can be applied to visual media in a movie or can be used in real-time -- that is, applied to image sources that are not contained in a movie. The code listed here and the QuickTime for Java classes are designed with this second usage in mind.
Example code to apply effects to a movie can be in the QuickTime SDK Example code. Especially the CompositedEffects, QTEffects and Transitions demonstrations
The QTEffect class forms the base class for visual effects. Depending on the effect itself, you can apply visual effects over a length of time or once only.
The code snippets in this section show how to use QuickTime's visual
effects architecture. The complete programs CompositedEffects.java,
PlayQTEffects.java and TransitionEffect.java
should be consulted for further examples of use of the code.
The effects in the code are applied, in real time, to
two images. The rendering of the transitions is controlled by the user
settings in the window's control panel.
Changes to any one of these three fields of the transition can affect the values of the other. Thus, changing the duration or frames per second (fps) will alter how many frames are rendered. The code updates the values in the other fields to reflect these dependencies. You set the duration of the transition if it is running using the time mode of the QTTransition class:
timeField.addActionListener (new ActionListener () {
public void actionPerformed (ActionEvent event) {
int output = ...  //get value from field
transition.setTime (output);
}
}
You set the number of frames the transition will take to render:
frameField.addActionListener (new ActionListener () {
public void actionPerformed (ActionEvent event) {
int output = ... //get value from field
transition.setFrames (output);
}
}
You set the number of frames per second that the transition should be rendered in:
fpsField.addActionListener (new ActionListener () {
public void actionPerformed (ActionEvent event) {
int output = ...//get value from field
transition.setFramesPerSecond (output);
}
}
You use this code snippet to make the transition run based on the settings. If the transition is profiling, some statistics about the transition are printed.
runEffectButton.addActionListener (new ActionListener () {
public void actionPerformed (ActionEvent event) {
try {
 transition.doTransition();
 if (transition.isProfiled()) {
    String profileString = "Transition Profile:"
        + "requestedDuration:" + transition.getTime()
        + ",actualDuration:" + transition.profileDuration()
        + ",requestedFrames:" + transition.getFrames()
        + ",framesRendered=" + transition.profileFramesRendered()
        + ",averageRenderTimePerFrame="
        + (transition.profileDuration()
        / transition.profileFramesRendered());
     System.out.println (profileString);
   }
 } catch (QTException e)
 {
 if (e.errorCode() != userCanceledErr)
       e.printStackTrace();
 }
}
}
You use this code snippet to show QuickTime's Choose Effects dialog box:
chooseEffectButton.addActionListener (new ActionListener () {
public void actionPerformed (ActionEvent event) {
     PlayQTEffectApp.showDialog (transition);
}
}
The two buttons in the following code snippet can change the mode of the transition. If the transition renders using time mode, it will potentially drop frames in order to render itself as close to the specified duration as possible. If the transition is set to doTime(false), it will render the currently specified number of frames as quickly as possible. This mode varies considerably from computer to computer based on the processing and video capabilities of the runtime environment.
frameButton.addItemListener (new ItemListener () {
public void itemStateChanged (ItemEvent event) {
transition.doTime (false);
}
});
timeButton.addItemListener (new ItemListener () {
public void itemStateChanged (ItemEvent event) {
transition.doTime (true);
}
}
Figs. 9.5 and 9.6 show two (of the many) effects from the program.
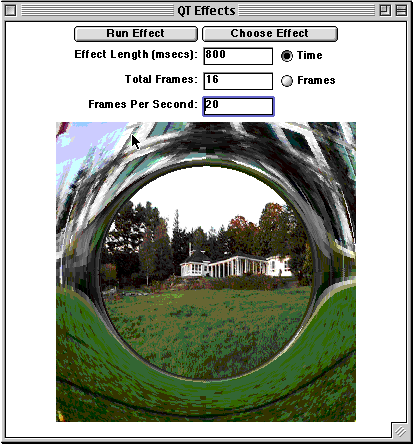
The explode effect frome the QT Effects program
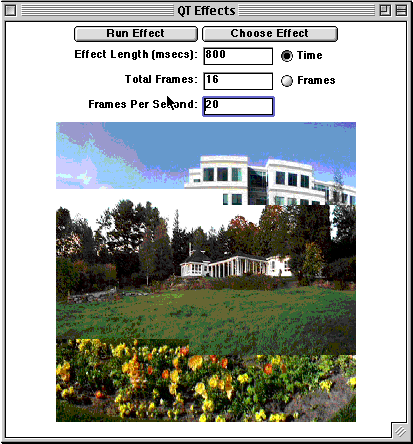
The matrix effect frome the QT Effects program
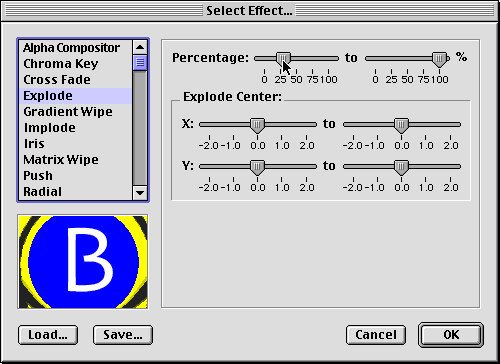
QuickTime's Choose Effects dialog box
public AtomContainer createSMPTEEffect (int effectType,
int effectNumber) {
   AtomContainer effectSample = new AtomContainer();
  // We are using SMPTE Effects so set the what atom to smpt
  effectSample.insertChild (new Atom(kParentAtomIsContainer),
            kEffectWhatAtom,
            1,
            0,
    EndianOrder.flipNativeToBigEndian32(kWipeTransitionType));
  // We are using SMPTE effect number 74 - start at 0%, stop at 100%
  effectSample.insertChild (new Atom(kParentAtomIsContainer),
            effectType,
            1,
            0,
            EndianOrder.flipNativeToBigEndian32(effectNumber));
     return effectSample;
}
In this example, the dialog box is configured to show only effects that expect two sources, but it can be configured to show effects applied or requiring only a single source.
public static void showDialog (QTEffect ef) throws QTException {
   AtomContainer effectSample
       = ParameterDialog.showParameterDialog(new EffectsList
           (2, 2, 0), 0);
   ef.setEffect (effectSample);
}
You use the doTransition() method, which is part of the QTTransition class in the quicktime.app.image package, to set parameters to control the rendering behavior of the effect.
QTTransition ef = new QTTransition();
ef.setTime (800);
ef.setSourceImage (sourceImage);
ef.setDestinationImage (destImage);
ef.setEffect (createSMPTEEffect (kEffectWipe,
kRandomWipeTransitionType));
Your application can also directly control the rendering of each frame of an effect through setting the frame directly and redrawing the effect.